sábado, 18 de abril de 2020

How to create virtual machine with #virt-manager

This will be a quick post about how to easy and quickly creates virtual machine with fixed some ANTIVMs

-1. You can connect to remote server via local virt-manager on your desktop
  • Press File -> New connection-> select checkbox ssh and specify user and server.
  • Or directly from command line:
    • virt-manager -c "qemu+ssh://YOUR_USER@YOUR_SERVER/system"
  • You need to ensure that this user can connect to libvirtd and add your ssh pub key to that user .ssh/authorized_keys). 
    •  usermod -G libvirt -a <YOUR_USERNAME>
    •  usermod -G kvm -a <YOUR_USERNAME>


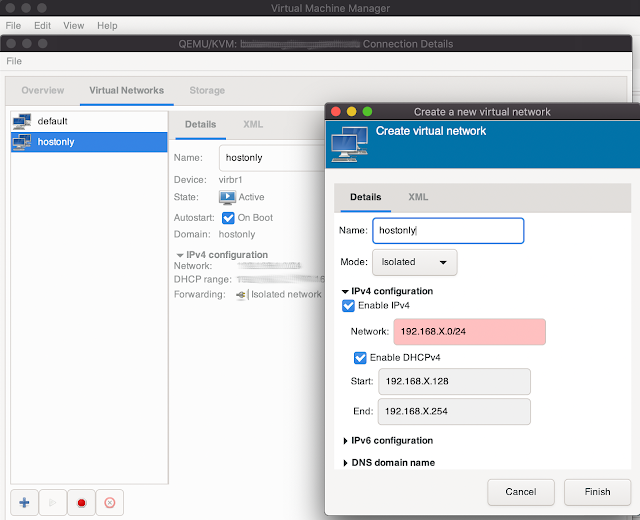
0. How to add network interface/type like HOSTONLY
In virt-manager press Edit -> Connection details -> "press +" ->  set your network range and select Isolated

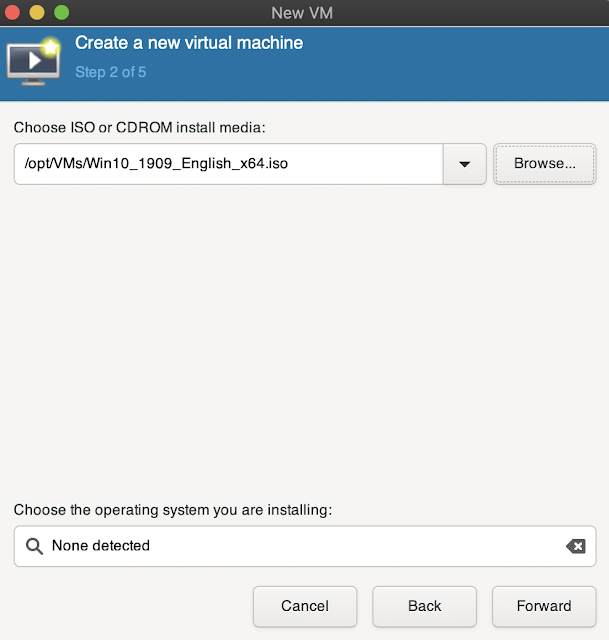
1. Press the icon under File


2. Select iso or any other way to install it, we will use ISO for this tutorial


3. Specify path to ISO
 

4. Set ram memory and number of CPUs for the vm
 

5. Create a specific hdd for vm, see Select or create custom storage, press Manage, see next screens


5.1 Set vm name, size > 100GB and format qcow2


5.2 Select new created image and press Choose Volume


6. Select Customize configuration before install, to be able to apply antivms and press finish


7. VM detailed configuration, in Overview select XML and follow instruction from this blogpost for antivm. IMPORTANT: use i44fx for <= Windows7, Q35 has better performance, but not supported out of box till Windows 10


9. Inside of the CPU type disable Copy host CPU configuration if is server cpu as XEON, and send one that you like, this is tricky part, if you selected cpu type that isn't compatible(cpu features) with your server cpu, your vm can be slow, so here you will need to play on your own, but think about real world cpu types NOT:


10. Set the Performance option as on this image


11. Networking, fake your MAC address and I strongly recommend to use hostonly instead of NAT


12. Press Apply, than Being Installation and do your OS install

13. To take snapshot: Press last icon you can see it selected like screen with play inside, then + at the bottom, set your snapshot name and press finish


Enjoy

domingo, 1 de marzo de 2020

QEMU - How to create different cpu types virual machines, ppc/mips/sparc/arm/etc

linux_arches

This blogpost will be a quick manual how to create virtual machines for different cpu types:

  • arm64
  • armel
  • armhf
  • mips
  • mipsel
  • powerpc
  • ppc64el
  • s390x

  • amd64 and i386 are omited due that is very simple :)

Install dependencies

Setting sudoers for qemu execution on HOST

visudo
Cmnd_Alias QEMU_CMD = /usr/bin/qemu-*, /sbin/ip, /sbin/ifconfig, /sbin/brctl
cape ALL=(ALL) NOPASSWD: QEMU_CMD

How to take snapshot, you need to add to your qemu command -monitor stdio

  • -monitor stdio
    • (qemu)
  • Save the VM state typing the following qemu commands in the qemu console:
    • (qemu) savevm init
  • Quit the QEMU console:
    • (qemu) q

create hdd

  • qemu-img create -f qcow2 ubuntu.img 16G

VM snapshot with static IP address.

Setting static ip in guest

    nano /etc/network/interfaces
    auto eth0
    iface eth0 inet static
        address 192.168.X.X
        netmask 255.255.255.0
        gateway 192.168.X.1
        dns-servers 1.1.1.1 1.0.0.1
    sudo nano /etc/resolves.conf
    nameserver 1.1.1.1

    sudo nano /etc/resolvconf/resolv.conf.d/head
    nameserver 1.1.1.1
  • /etc/init.d/networking restart

Install VM per architecture

PowerPC/PowerPC64/PowerPC64el

  • Installation

        wget http://cdimage.ubuntu.com/releases/18.04/release/ubuntu-18.04.4-server-ppc64el.iso
        qemu-img create -f qcow2 ubuntu-ppc.qcow2 16G
        qemu-system-ppc64 -m 1024 -hda ubuntu-ppc.qcow2 -boot d -cdrom ubuntu-18.04.4-server-ppc64el.iso
    

  • Start vm

    • qemu-system-ppc -m 1024 -hda ubuntu-ppc.qcow2

WIP:arm64, armel, armhf, mips, mipsel, powerpc, s390x

Bible to solve issues

* https://www.evonide.com/non-root-gpu-passthrough-setup/

Utils:

  • To connect to tty: $ minicom -D /dev/pts/6

  • set iface up/down: $ ip link set dev up/down

  • to see ipaddr $ ip addr show

Network setup on host

  • allow br0 $ echo “allow br0” > /etc/qemu/bridge.conf

  • Add the following config to /etc/qemu-ifup, backup the original if you already have one:

    • code can be found in QEMU/qemu-ifup
    • chmod 755 /etc/qemu-ifup

useles if you use cape/cuckoo rooter, but useful to activate access to some vms during instalation

    echo 1 > /proc/sys/net/ipv4/ip_forward
    iface=$(route | grep '^default' | grep -o '[^ ]*$')
    iptables -t nat -A POSTROUTING -o $iface -j MASQUERADE
    iptables -I FORWARD 1 -i tap0 -j ACCEPT
    iptables -I FORWARD 1 -o tap0 -m state --state RELATED,ESTABLISHED -j ACCEPT

sábado, 29 de febrero de 2020

CAPE sandbox config extraction demystified

cape_explained
  • There is still work in progress, for a lot of improvements and goodies, but only in CAPEv2, v1 is dead :)

CAPE extraction demystified, this is based on CAPEv2

  • As one of my friends asked me recentrly how CAPE extraction works and how I do that, yes I do that differently, why not? :D

CAPE debugger based config extraction

  • Only CAPE debugger based extractors requires more than 1 sandbox run
  • Debugger extractor on first run grabs the offsets, set breakpoints and extracts the config on second run, but that also can be done in another way, will explain at the end of the post
  • If you want to undestand how this works, read submitCAPE.py
  • The new plan(submitCAPE2) will be have a checkbox already ticked with combo option, then if any second job is needed (like you say for debugger mainly) it will have a sum of all the options needed in one go from submitCAPE2

External libraries/external extractors

  • pip3 install mwcp git+https://github.com/kevthehermit/RATDecoders

DC3-MWCP

  • Integration, we only import all plugins once

    #Import All config parsers
    try:
        import mwcp
        mwcp.register_parser_directory(os.path.join(CUCKOO_ROOT, "modules", "processing", "parsers", "mwcp"))
        malware_parsers = {block.name.split(".")[-1]:block.name for block in mwcp.get_parser_descriptions(config_only=False)}
        HAS_MWCP = True
    
        #disable logging
        #[mwcp.parser] WARNING: Missing identify() function for: a35a622d01f83b53d0407a3960768b29.Emotet.Emotet
    except ImportError as e:
        HAS_MWCP = False
        print("Missed MWCP -> pip3 install git+https://github.com/Defense-Cyber-Crime-Center/DC3-MWCP\nDetails: {}".format(e))
    

  • Please pay attention that current parsers are in CAPEv2/modules/processing/parsers/mwcp

  • You can add your plugins to there too, but you need to follow their structure format, I strongly suggest to see as example DridexLoader which I rewrote for optimizations
#static_config_parsers - https://github.com/kevoreilly/CAPEv2/blob/master/lib/cuckoo/common/cape_utils.py#L138
if cape_name and HAS_MWCP and cape_name in malware_parsers:
    try:
        reporter = mwcp.Reporter()
        reporter.run_parser(malware_parsers[cape_name], data=file_data)
  • So as you might know CAPE dumps all kinds of payloads/extractions/shellcodes/compressions/unpacking/etc, and then scan with YARA from CAPE folder
  • If yara matched, and we have library and name of yara is in our dict of config extractors, we run it on the matched file and extract confing, pretty simple :)

RATDecoders

  • Import
try:
    from malwareconfig import fileparser
    from malwareconfig.modules import __decoders__, __preprocessors__
    HAS_MALWARECONFIGS = True
except ImportError:
    HAS_MALWARECONFIGS = False
    print("Missed RATDecoders -> pip3 install git+https://github.com/kevthehermit/RATDecoders")
  • Usage

    if not parser_loaded and cape_name in __decoders__:
        try:
            file_info = fileparser.FileParser(rawdata=file_data)
            module = __decoders__[file_info.malware_name]['obj']()
            module.set_file(file_info)
            module.get_config()
            malwareconfig_config = module.config
            #ToDo remove
            if isinstance(malwareconfig_config, list):
                for (key, value) in malwareconfig_config[0].items():
                    cape_config["cape_config"].update({key: [value]})
            elif isinstance(malwareconfig_config, dict):
                for (key, value) in malwareconfig_config.items():
                    cape_config["cape_config"].update({key: [value]})
        except Exception as e:
            log.error("CAPE: malwareconfig parsing error with %s: %s", cape_name, e)
    

  • As you can see, if not parser_loaded(if we don’t have MWCP/CAPE extractors) and matched yara(cape_name) is in RATDecoders parsers, run it

CAPE extractors

  • Import

    cape_decoders = os.path.join(CUCKOO_ROOT, "modules", "processing", "parsers", "CAPE")
    CAPE_DECODERS = [
        os.path.basename(decoder)[:-3]
        for decoder in glob.glob(cape_decoders + "/[!_]*.py")
    ]
    
    for name in CAPE_DECODERS:
        try:
            file, pathname, description = imp.find_module(name, [cape_decoders])
            module = imp.load_module(name, file, pathname, description)
            malware_parsers[name] = module
        except (ImportError, IndexError) as e:
            print("CAPE parser: No module named %s - %s", (name, e))
    

  • Usage, if we don’t have MWCP extractor but we have CAPE’s

    if not parser_loaded and cape_name in malware_parsers:
        parser_loaded = True
        try:
            cape_config = malware_parsers[cape_name].config(file_data)
            if isinstance(cape_config, list):
                for (key, value) in cape_config[0].items():
                    cape_config["cape_config"].update({key: [value]})
            elif isinstance(cape_config, dict):
                for (key, value) in cape_config.items():
                    cape_config["cape_config"].update({key: [value]})
        except Exception as e:
            log.error("CAPE: parsing error with %s: %s", cape_name, e)
    

To access config you can:

  • In signatures/reporting module check self.results["cape_config"]
  • With API host/configdownload/<task_id>/<cape_name>, where cape_name is malware family name

Standalone/Custom extractors

  • If you don’t like any previous example or you want to make your own extractor, I always placing them in CAPEv2/lib/cuckoo/common/decoders/
  • Then just import that in your signature and execute it on your matched file.
  • Im strongly recommend to go with signatures as they allows you to do a lot of different checks to detect malware family, and once you sure that is that family run your extractor, you just import your plugins lets say
    • from lib/cuckoo/common/decoders/my_custom_extractor import extractor
  • Few utilities:
    • you have yara_detected function that checks all files(dropped/procdump/procmemory/binary/etc) and returns you path and other details see abstracts.py for details, so you can run config = extractor(path), volia, you got your config :P
    • Even if you using Volatility <3, I also recomment to run it from signatures and not from memory.py(by adding it to memory.conf also)

Volatility3 <3333333

  • Im a huge fun of Volatility, Vol3 has up to 50% time cut out of the box without tricks, thats just amazing, if someone says vol is slow, thats because you didn’t learn how to tune it for max performance and do some tricks
  • So tricks:

    • Vol2 - kdbg value ;)
    • inside of the signature:
      from modules.processing.memory import VolatilityAPI
      
      # later in code once you sure that is your family
      volapi = VolatilityAPI(mem_path, profile, kdbg)
      command = volapi.plugins["<MALWARE_FAMILY>"](volapi.config)
      pids = self.get_pids()
      for rounds in range(1, 3):
          log.info("Executing vol with round: {}".format(rounds))
          for task, config in command.calculate(pids, rounds):
              # only return the first extracted config
              if config:
                  return config
      
  • Note that I’m using get_pids function, that function gets all pids captured by CAPE, and do memdump scan in 2 rounds

    1. Scans only captured pids, works in 99% and extraction time is extremely short
    2. Scans the rest of the pids without pids from round 1, just in case if there is new injection technic or something else happend
    3. For me in 99% works with just first round
  • If you want to learn to write volatility examples here are few examples

I hope you learned something useful, enjoy and remember, be friedly, we doing this in our free time for fun

jueves, 26 de septiembre de 2019

MongoDB sharding and replicas - my personal notes

mongo_sharding_replicas

Install latest mongo

    sudo apt-key adv --keyserver hkp://keyserver.ubuntu.com:80 --recv 9DA31620334BD75D9DCB49F368818C72E52529D4
    echo "deb [ arch=amd64 ] https://repo.mongodb.org/apt/ubuntu $(lsb_release -cs)/mongodb-org/4.2 multiverse" | sudo tee /etc/apt/sources.list.d/mongodb.list

    sudo apt-get update && sudo apt-get install -y mongodb-org-mongos mongodb-org-server mongodb-org-shell mongodb-org-tools
    pip install pymongo -U

Distributed Mongo setup:

Set one mongo as master and the rest just point to it, in this example 192.168.1.1 is our master server. Depend of your hardware you may prepend next command before mongod

  • numactl –interleave=all

This commands should be executed only on master:

  • Start them all on MASTER, systemd files for master/slave will be at the end of the post

        mkdir -p /data/{config,}db
        /usr/bin/numactl --interleave=all /usr/bin/mongod --config /etc/mongod.conf --shardsvr --bind_ip 0.0.0.0 --port 27017 --replSet rs0
        /usr/bin/numactl --interleave=all /usr/bin/mongod --configsvr --replSet cuckoo_config --bind_ip 0.0.0.0
        # if fails, you need to point to cuckoo_config/localhost:27019
        /usr/bin/mongos --configdb cuckoo_config/192.168.1.1:27019 --port 27020
    

  • initialize the replica set aka backup for config server

        mongo --host 127.0.0.1 --port 27019 --eval "rs.initiate({_id: "cuckoo_config", configsvr: true, members: [{ _id: 0, host: "192.168.1.1:27019" }]})"
    

  • if you see: “No host described in new configuration 1 for replica set cuckoo_config maps to this node”,

    • Solution. rs.initialize()
  • To add extra config servers rs.add(“cuckoo_config/192.168.1.2:27017”)

  • This should be started on all nodes including master:

    mkdir -p /data/{config,}db
    /usr/bin/mongod --shardsvr --bind_ip 0.0.0.0 --port 27017 --replSet rs0
    /usr/bin/mongos --configdb cuckoo_config/192.168.1.1:27019 --port 27020
    # enable data query from slaves
    mongo --eval 'rs.slaveOk()'

After execute that on each node, go to master and execute

mongo --port 27017 --eval "rs.initiate({_id: "rs0",version: 1,members: [
         { _id: 0, host : "192.168.1.1:27017", priority: 1 },
         { _id: 1, host : "192.168.1.2:27017", priority: 0.5},
         { _id: 2, host : "192.168.1.3:27017", priority: 0.5},
         { _id: 3, host : "192.168.1.4:27017", priority: 0.5},
         { _id: 4, host : "192.168.1.5:27017", priority: 0.5},
]})"

To add more clients, execute on master mongo server:

    mongos --configdb cuckoo_config/192.168.1.1:27019 --port 27020
    mongo --port 27020
    sh.addShard( "rs0/192.168.1.1:27017")
    sh.addShard( "rs0/192.168.1.2:27017")
    sh.addShard( "rs0/192.168.1.3:27017")
    sh.addShard( "rs0/192.168.1.4:27017")
    sh.addShard( "rs0/192.168.1.5:27017")

Where 192.168.1.(2,3,4,5) is our cuckoo slaves::

    mongo --port 27020
    use cuckoo
    db.analysis.ensureIndex ( {"_id": "hashed" } )
    db.calls.ensureIndex ( {"_id": "hashed" } )
    sh.enableSharding("cuckoo")
    sh.shardCollection("cuckoo.analysis", { "_id": "hashed" })
    sh.shardCollection("cuckoo.calls", { "_id": "hashed" })

Convert standalone shards, to replica shards

To see stats on master:

    mongo --host 127.0.0.1 --port 27020
    sh.status()
  • Modify cuckoo reporting.conf [mongodb] to point all mongos in reporting.conf to
    host = 127.0.0.1
    port = 27020
    

To remove shard node:

  • To see all shards:`

    • db.adminCommand( { listShards: 1 } )
  • Then:

    • use admin
    • db.runCommand({removeShard: "SHARD_NAME_HERE"})
  • Errormsg - movePrimary may only be run against the admin database.

  • Solution:

    • db.runCommand( { movePrimary: “cuckoo”, to: “SHARD_NAME_HERE” })
    • db.runCommand({removeShard: “SHARD_NAME_HERE”})
  • Stop draining:

    • use config
    • db.shards.update({},{$unset:{draining:true}}, false, true)
  • https://docs.mongodb.com/manual/tutorial/remove-shards-from-cluster/

Replica set configuration/reconfig

cfg = rs.conf();
cfg.members[0].priority = 2;
rs.reconfig(cfg, {force:true});
* https://docs.mongodb.com/manual/reference/method/rs.reconfig/

To remove members of replica set

cfg = rs.conf()
cfg.members = [cfg.members[0]]
rs.reconfig(cfg, {force : true})

Replica states:

Number  Name    State Description
0   STARTUP Not yet an active member of any set. All members start up in this state. The mongod parses the replica set configuration document while in STARTUP.
1   PRIMARY The member in state primary is the only member that can accept write operations. Eligible to vote.
2   SECONDARY   A member in state secondary is replicating the data store. Eligible to vote.
3   RECOVERING  Members either perform startup self-checks, or transition from completing a rollback or resync. Eligible to vote.
5   STARTUP2    The member has joined the set and is running an initial sync. Eligible to vote.
6   UNKNOWN The member’s state, as seen from another member of the set, is not yet known.
7   ARBITER Arbiters do not replicate data and exist solely to participate in elections. Eligible to vote.
8   DOWN    The member, as seen from another member of the set, is unreachable.
9   ROLLBACK    
This member is actively performing a rollback. Eligible to vote. Data is not available for reads from this member.

Starting in version 4.2, MongoDB kills all in-progress user operations when a member enters the ROLLBACK state.

10  REMOVED This member was once in a replica set but was subsequently removed.

Debug the problems commands:

  • journalctl -xe
  • tail /var/log/mongodb/mongod.log

Errors and Solutions:

  • exception in initAndListen: 20 Attempted to create a lock file on a read-only directory: /var/lib/mongodb, terminating

    • SOLUTION: sudo chown mongodb:mongodb /var/lib/mongodb -R
  • exception in initAndListen: 98 Unable to lock file: /var/lib/mongodb/mongod.lock Resource temporarily unavailable. Is a mongod instance already running?, terminating

    • You have running instance, close it
  • permission problem:

    • sudo chown -R mongodb:mongodb /var/lib/mongodb/
    • sudo chmod -R 755 /var/lib/mongodb
  • Error - Unit mongod.service is masked

  • Solution: sudo systemctl unmask mongod

  • Error - WT_PANIC: WiredTiger library panic

  • Solution:

    • mongod –repair –dbpath /database/db –storageEngine wiredTiger
  • Error - HostUnreachable: Connection refused

  • Solution:

    • Check if the mongo is run on that server
  • Error - “E11000 duplicate key error collection: admin.system.version index: id dup key: { : "shardIdentity" }”,

  • Solution - remove /data on slave

  • Error:

    • “can’t add shard ‘X:27017’ because a local database ‘cuckoo’ exists in another shard0001”
  • Solution:

    • drop mongodb on shard
      • use DB_NAME
      • db.dropDatabase()
  • Error:

    • replSetReconfig should only be run on PRIMARY, but my state is REMOVED; use the "force" argument to override
  • Solution:

    • rs.reconfig(cfg, { force: true })
  • Error:

    • Either all host names in a replica set configuration must be localhost references, or none must be; found 1 out of 2
  • Solution:

Default Port Description

  • 27017
    • The default port for mongod and mongos instances. You can change this port with port or –port.
  • 27018
    • The default port for mongod when running with –shardsvr runtime operation or the shardsvr value for the clusterRole setting in a configuration file.
  • 27019
    • The default port for mongod when running with –configsvr runtime operation or the configsvr value for the clusterRole setting in a configuration file.

Systemd config files

see systemd folder - /etc/systemd/system/

systemctl daemon-reload &&
sudo systemctl restart mongo*
sudo systemctl status mongos
sudo systemctl status mongodb
sudo systemctl status mongodb_config # only master
sudo systemctl enable mongos && sudo systemctl enable mongosdb
sudo systemctl enable mongos_config # only master

mongod_config.service - only on master

# /etc/systemd/system/mongod_config.service
[Unit]
Description=High-performance, schema-free document-oriented database
After=network.target mongodb.service

[Service]
User=root
ExecStartPre=/bin/mkdir -p /data/db
ExecStartPre=/bin/chown mongodb:mongodb /data/db -R
ExecStart=/usr/bin/numactl --interleave=all /usr/bin/mongod --quiet --configsvr --replSet cuckoo_config --bind_ip_all
ExecReload=/bin/kill -HUP
Restart=always
# enable on ramfs servers
# --wiredTigerCacheSizeGB=50
User=mongodb
Group=mongodb
StandardOutput=syslog
StandardError=syslog
SyslogIdentifier=mongodb_config

[Install]
WantedBy=multi-user.target

mongod.service

# /etc/systemd/system/mongodb.service
[Unit]
Description=High-performance, schema-free document-oriented database
Wants=network.target
After=network.target

[Service]
ExecStartPre=/bin/mkdir -p /data/db
ExecStartPre=/bin/chown mongodb:mongodb /data/db -R
# https://www.tutorialspoint.com/mongodb/mongodb_replication.htm
ExecStart=/usr/bin/numactl --interleave=all /usr/bin/mongod --quiet --shardsvr --bind_ip_all --port 27017 --replSet rs0
ExecReload=/bin/kill -HUP $MAINPID
Restart=always
# enable on ramfs servers
# --wiredTigerCacheSizeGB=50
#User=mongodb
#Group=mongodb
#StandardOutput=syslog
#StandardError=syslog
#SyslogIdentifier=mongodb

[Install]
WantedBy=multi-user.target

mongos.service

# /etc/systemd/system/mongos.service
[Unit]
Description=Mongo shard service
After=network.target
After=bind9.service
[Service]
PIDFile=/var/run/mongos.pid
User=root
ExecStart=/usr/bin/mongos --configdb cuckoo_config/192.168.1.1:27019 --port 27020
[Install]
WantedBy=multi-user.target

Security and checklist

For more information see: